Viewing and updating project statuses
Four project statuses are available in Polaris, that reflect the four typical phases of project execution. The following are the default names for each stage, but you can customize the names to match your project workflow:
- Initiate
- Planning
- Execution
- Closeout
The project’s current status displays at the top, left-hand corner of that project’s page.
Each status has customizable sub-steps that you can mark off as you complete them, to keep track of where you are in the project’s setup and execution.
Project status determines whether resources can enter time
Status also determines whether or not resources can enter time against the project.
Administrators can configure which statuses allow time entry using the Administration > Project Settings > Allow Time Entry for field.
You can choose to allow time entry in Initiate, Planning, or Execution phases, or you can limit time entry to the Execution phase only.
This is a global setting that applies to all projects in your system.
Resources can never enter time while a project is in Closeout phase, or if it has been archived.
Changing a project's status
Changing the status of the project will change the header color of the Projects page, so you can see the status of each project at a glance.
You can also filter all projects by status, by clicking the tabs at the top of the Projects page.
To change a project’s status:
- Go to Projects > List, and open the project.
The current status displays right under the project’s name, in the top, left-hand corner of the page.
- Click the
icon beside the name of the current status.
- Click Set Status beside the desired status label. You can also check off completed tasks, if you want.
Updating the status of multiple projects
You can change the status of multiple projects at once. You can assign only one status at a time.
To update the status of multiple projects:
- Go to Projects > List or Projects > Timeline.
- Select the check boxes for projects you want to update.
- Click the Status button that displays in the lower, right-hand corner of the page.
The Edit Status dialog displays.
- Choose the applicable status.
- Click Update Status.
Customizing statuses and checklist items
Customizing the status names
Polaris administrators can update the names of the four statuses to better reflect your organization's project workflow.
To update names:
- Go to Administration > Projects > Project Settings.
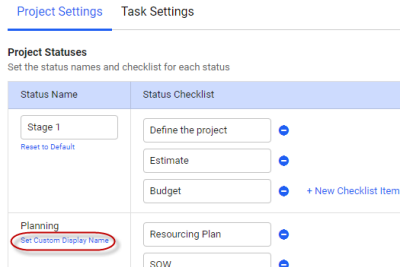
- In the Project Statuses table, click the Set Custom Display Name link, and change the name, for each status you want to update.
All projects will update with the new status names.
Customizing the project checklists
Administrators can create new default checklists that apply to all new projects created in the system, that PMs can check off as they’re completed.
You can also customize the list of tasks for each project, if some projects follow a different workflow.
To add a new default checklist:
- Go to Administration > Projects > Project Settings.
- In the Project Statuses table, update the names for each status, as desired. You can also add addition items, by clicking the New Checklist Item link.
Now, the new lists will populate any new projects you create.
To edit the task list for a status for one single project only:
- Open the project status interface by clicking the
icon.
- Click the Edit button located at the top, right-hand corner of the page.
The task names will become editable.
- Make any desired changes. You can also add or remove items by clicking the
and
icons.


