New features in Replicon and Polaris
This topic gives an overview of the new features added to Replicon and Polaris in the past few quarters.
You can subscribe to have our weekly product updates delivered directly to your inbox. Updates include information on upcoming features, newly-released features and improvements, and bug fixes.
If you're looking for information on older new features, refer to the New features in Replicon and Polaris - Archive topic.
Q2 2025
IN POLARIS ONLY
|
Resourcing |
|
| Projects & Billing |
|
| Punches |
|
IN REPLICON ONLY
|
Projects |
|
|
Time Off |
|
|
Scheduling |
|
|
Compliance |
|
IN REPLICON & POLARIS
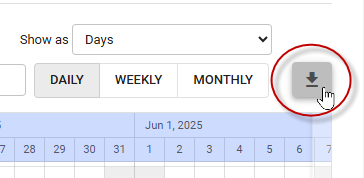
| Timesheets |
|
Q1 2025
IN REPLICON & POLARIS
|
ZeroTimeTM |
|
| System |
|
| Timesheets |
|
IN POLARIS ONLY
|
Project Management |
|
| Cost Management |
|
IN REPLICON ONLY
| Time Off |
|
| Compliance |
|
Q4 2024
New features video
IN REPLICON ONLY
|
Timesheets & Punches |
|
|
Time Off |
|
|
Scheduling |
|
|
Compliance |
|
|
Integrations |
|
IN POLARIS ONLY
|
Billing |
|
| Expenses |
|
| Resourcing |
|
IN REPLICON & POLARIS
|
Timesheets |
|
|
Time Off |
|
|
Integrations |
|
Q2 2025 - In Polaris only
RESOURCING
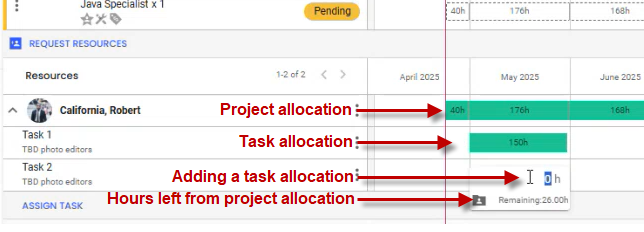
Task allocation
Currently in Polaris, you can allocate resources to projects, and you can assign resources timesheet access to tasks. But, you can’t allocate resources to tasks (i.e. specify when and for how long the resource should work on a task).
But soon, you’ll be able to allocate resources directly to tasks.
The benefits of task allocation
There are several benefits to task-level allocation:
- Project managers can check resource availability when planning tasks, to ensure resources have time to work on each task they’re assigned to
- Managers can view actual hours worked per task vs the allocated hours
- Resources know when to work on a task, and how much time they are expected to spend on it
How task allocation works
With this new feature, PMs will be able to allocate resources to tasks from either the Resource Plan tab or the Tasks tab for a project.
On the Resource Plan tab…
- The PM will click Assign Task located under a user’s project allocations, and they’ll select one or more tasks from the dialog that displays.
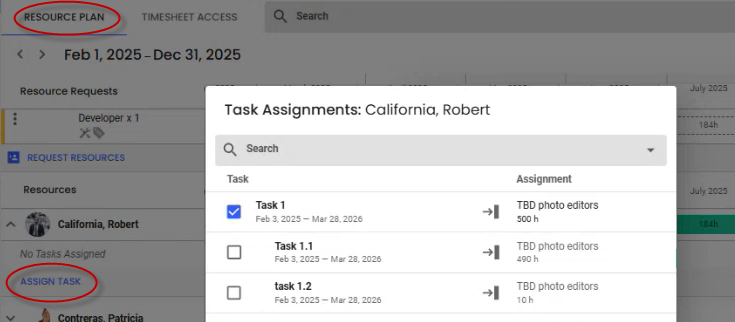
- Once a task is assigned to the user and project, the PM will be able to allocate the resource to that task.
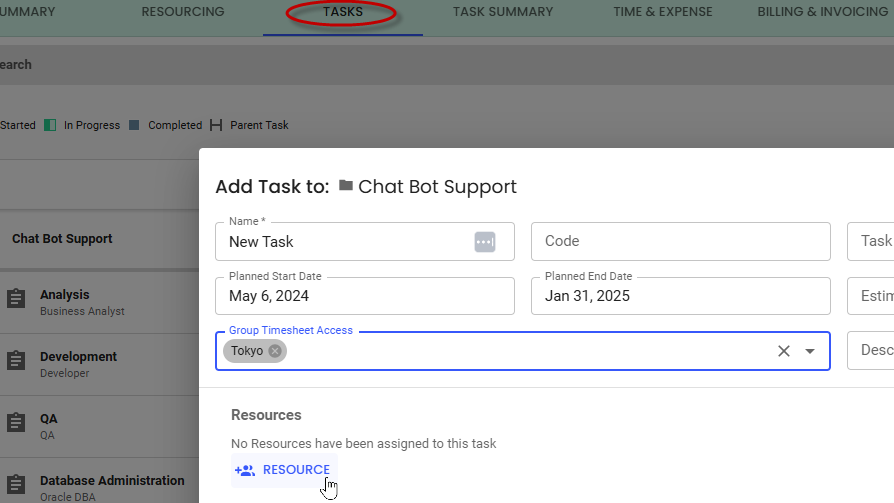
On the Tasks tab…
- A new task creation dialog will be available when you click the + icon. PMs can use this dialog to add new tasks, or to add a task and allocate placeholders to it. (See below for more on placeholders.)
- And, for existing tasks, they can allocate resources using the task drawer.

Project managers will be able to allocate as many resources as they need to a task, but each resource will only be able to use one role and rate for that task.
Introducing placeholders
With this feature, we’ll be introducing role and resource placeholders in Polaris. PMs will be able to assign a placeholder to a task, to indicate the role or resource that’s required. Then, once the project is approved, the PM can allocate that resource to the task.
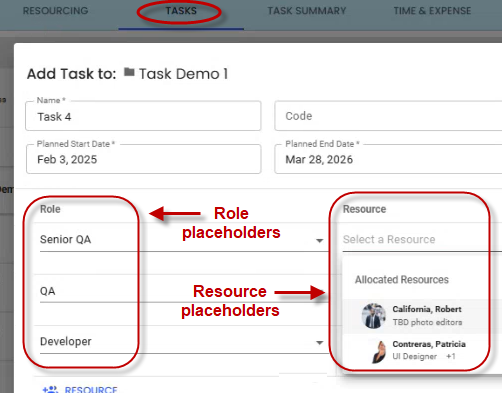
PMs will assign placeholders using the Tasks tab – when adding new tasks or via the task drawer of existing tasks – or by assigning resources to tasks via the Resource Plan or Timesheet Access tabs. They’ll be able to update placeholders with task allocations in task drawers or on the Resource Plan page.
Project managers will be able to allocate as many resources as they need to a task, but each resource will only be able to use one role and rate for that task.
Benefits for customers who don’t want to allocate to tasks
If a customer doesn’t require task-level allocation, customers can continue:
- Allocating only at the project level, or
- Assigning users timesheet access to tasks on an ad hoc basis, without specifying a work span or duration
In both cases, they’ll start seeing task actuals on the Resource Plan page when this feature is launched.
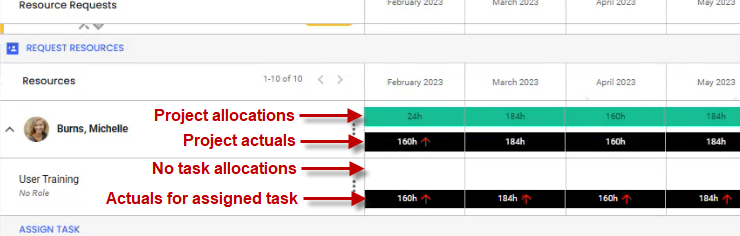
And, they can retroactively add allocations that match their actuals, if their workflow requires that.
Related updates
With this new feature, we’ll be launching some related improvements across the project resourcing pages. For instance:
- Changes you make on one project resourcing page will sync across all other resourcing pages, so you could, for example, assign tasks from the Timesheet Access tab or the Resource Plan tab, and allocate resources to tasks from the Resource Plan tab or the Tasks tab, as you prefer.
- The allocated role name will no longer be shown on the Resource Plan tab nor will the task owner display on the Tasks tab. Instead, the task and task role will display on both tabs.
- If a single resource has more than one allocation with the same role for a project, then all allocations for that role will be merged into a single allocation
- On the Tasks tab, you’ll see the number of resources allocated or assigned as resource placeholders to each task. If role placeholders exist, we’ll show a total including how many roles still need to be filled.

- We’ll be displaying all project allocation bars for overallocated projects in purple, and bars for overallocated tasks in red
- If a PM has resource manager permissions, new and updated task allocations will roll up and be included in the project allocation total
- You’ll see some usability improvements, such as new add task buttons on the Tasks tab
Will this feature be enabled automatically?
Yes, when launched, this feature will be automatically available to all project managers with Resource Project Allocations permission.
Hiring integration with Talent Management
Soon in Polaris, we’ll be introducing an integration with Deltek Talent Management (DTM) that enables automated requesting, fulfillment, and allocation of new hires. You will need DTM to use this feature.
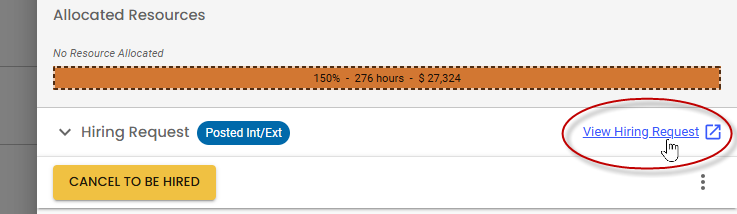
Currently in Polaris, if no suitable resource is available to fulfill an allocation request, the resource manager can mark that role as To Be Hired. However, since HR and hiring capabilities are beyond the scope of Polaris, managers have to manually handle hiring requests and allocations outside of the app.
With this new integration:
- In Polaris, resource managers (RMs), and project managers with RM permissions, can request that a resource be hired for a role.

- That request will be automatically sent to DTM, including detailed requirements from Polaris.
- In DTM, a hiring requisition is auto-created, and the hiring process proceeds until the requisition is fulfilled.

- Once a resource has been hired, they will be automatically added to Polaris and allocated to the relevant project and role.
All project managers will see status updates – using DTMs status categories – within projects as the hiring process proceeds, and will be able to easily withdraw requests that are no longer needed.
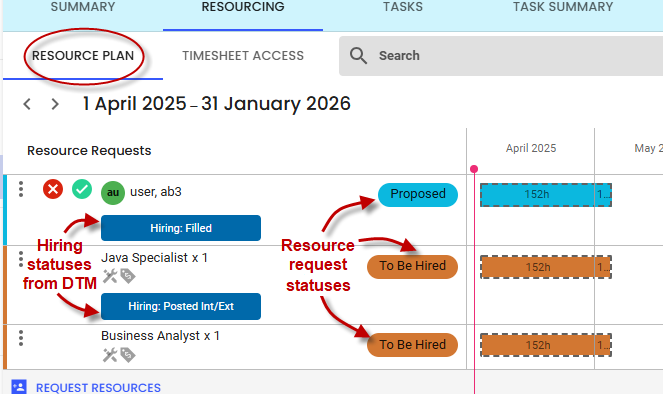
Once the job is posted in DTM, PMs with a DTM license will be able to access its requisition details by clicking the View Hiring Request link in the task’s drawer; this should open DTM directly if they use SSO, otherwise they’ll need to log in.
Benefits of this workflow
- Automated forwarding of required hires to the hiring queue fills gaps quickly and keeps projects on schedule.
- Automated relay of detailed new hire requirements, together with automated addition and allocation of new hires in Polaris, minimizes errors and delays resulting from manual tracking and entry.
- Real-time visibility into the hiring status of roles keeps everyone in the loop, fostering better collaboration and risk management.
Will this feature be enabled automatically?
No. To enable this feature, you’ll need to contact Deltek Support so we can set up your integration between Polaris and Talent Management.
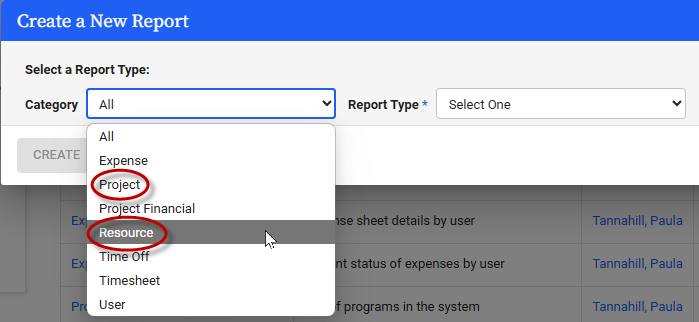
Two Project reports recategorized under Resource
We’ll soon be moving two report templates currently located under the Project category to the Resource category. The two templates are:
- Resource Request vs Allocation, and
- Resource Allocation
We’re making this change so the reports are easier to find.
Will this feature be enabled automatically?
Yes, this change will be made for all users with report access when it is rolled out.
PROJECTS
Project mass edit
You'll soon be able to edit multiple Polaris projects at once.
To mass edit, on the Project list page, you’ll select the projects you want to edit, make your changes, and click Mass Edit.

These are the fields you’ll be able to mass edit:
- Status
- Client
- Program
- Project Manager Timesheet Approval
- Time Entry
- Project Currency
- Client Representative
- Project Manager
- Project Time & Expense Entry
- Groups
- Fixed and dynamic custom fields
This new functionality will allow you to quickly make changes to multiple projects, right within the project interface.
Note: You can still mass edit projects using Polaris’ import functionality.
Will this feature be enabled automatically?
Yes, when launched, this feature will be available to project managers, for projects they have access to, by default.
PUNCHES
Improved support for punch functionality
We’ll soon be improving the user experience for those using Replicon time punches in Polaris. To see these changes, customers must be using Replicon’s Workforce Management or Time Attend Plus products, together with Polaris.
Currently, when punch users access Polaris, they don’t see a Time Punches tab in their My Work section, but instead have to follow a roundabout path – navigating from Reports to My Replicon – to find that tab.
With this change, a Time Punches tab will be available on the My Work tab for punch users. Plus, we’ll hide the Tasks card for those not using a Time Distribution Grid timesheet.
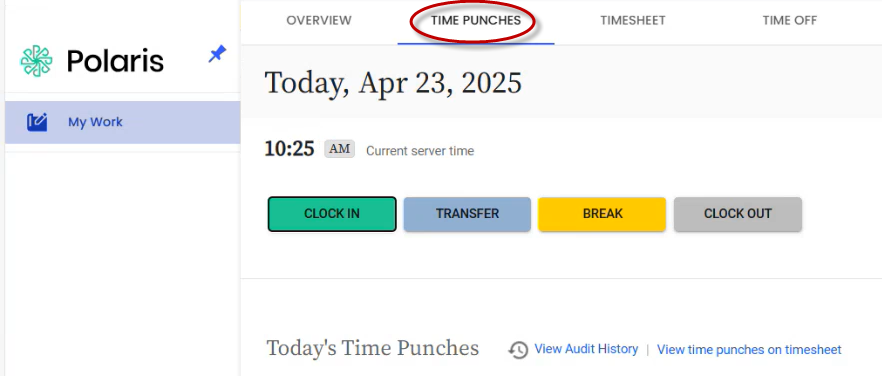
These changes will make it easier for Replicon customers to move to Polaris without losing functionality.
Notes:
- Punch functionality will not be available if you have only Polaris licenses
- A download icon for the Polaris desktop app will still display on the Tasks card, even though punch usage is not compatible with that app. Users who click this icon will encounter an error message.
Will this feature be enabled automatically?
Yes, this feature will be available by default once it’s launched, but only for time punch users, who have licenses for Replicon’s Workforce Management or Time Attend Plus products, and for Polaris.
BILLING
Capped billing
In Polaris, you’ll soon be able to set a cap on the amount that can be invoiced for a project.
To enable a cap, you’ll go to the Financials card, and enable the Limit issued bills to Total Contract Value field.
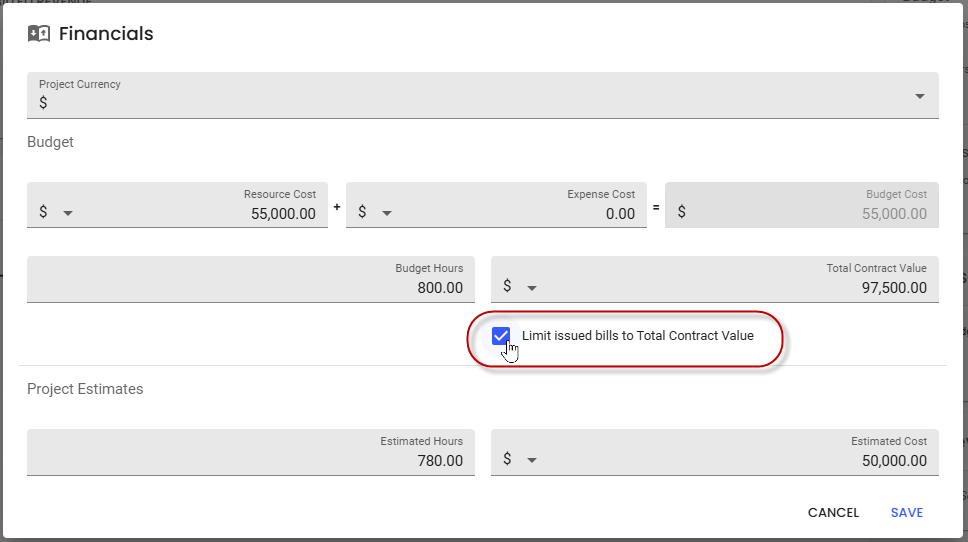
Then, if billing managers attempt to send invoices that exceed the total contract value you’ve set for that project, they’ll encounter an error message.
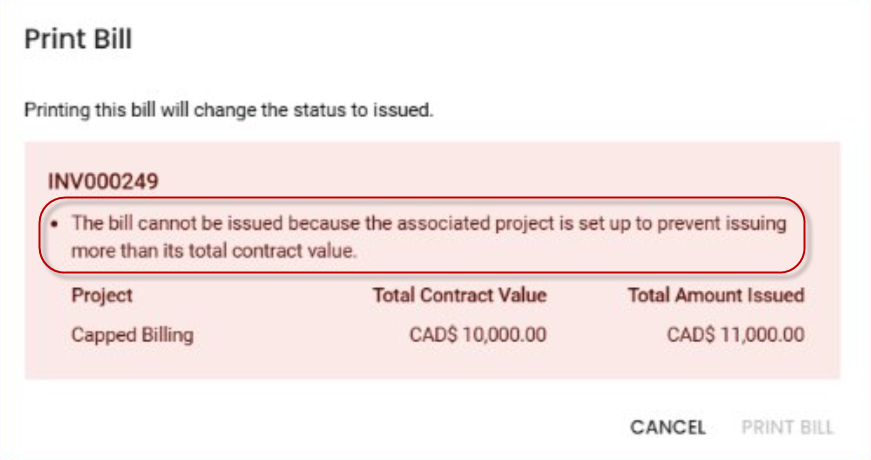
A message that shows the total contract value limit will also display on the Bill Plan card for the project.
Note, setting up a cap does not prevent you from creating bills for project work, and it doesn’t block work on that project from being completed and recorded. It simply blocks invoicing until you can update the total contract value.
Will this feature be enabled automatically?
Yes, once launched, this feature will be available to all project managers in Polaris by default.
Q2 2025 - In Replicon only
PROJECTS
Time off visibility for project managers
Project managers will soon be able to view time off for members of their project teams. This should help managers better understand resource availability, and better plan their projects and forecast revenue.
To see time off, PMs must be assigned Team Time Off permission in their Project Management permission set.

With this permission assigned, if the PM goes to Project > Team > Time Off for a project, they’ll be able to see time off:
- That is either awaiting approval or has been approved
- That falls between the start and end dates of that project
- For all team members who are assigned to that project as individuals (i.e. they won’t see time off for users added as part of a group)
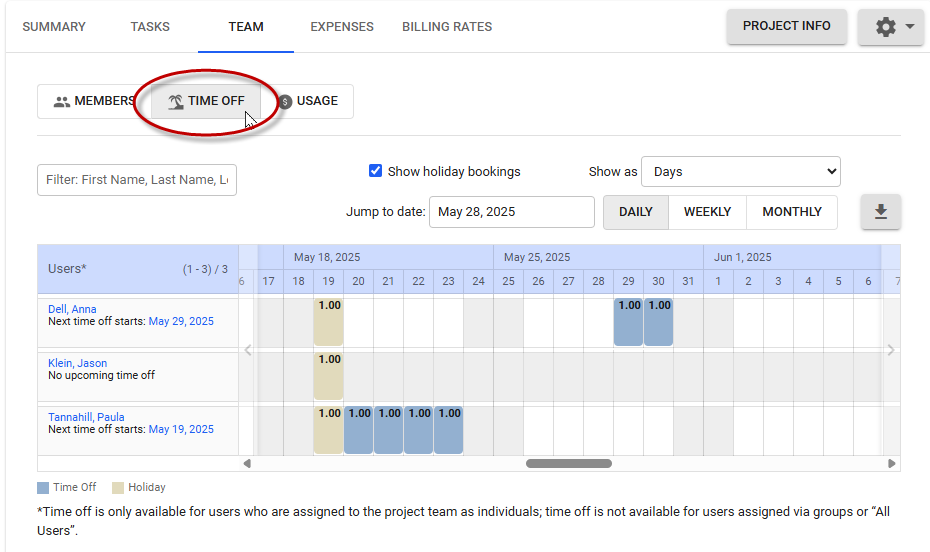
To protect user privacy, they will not be able to see booking details such as the type of time off, comments or custom fields, nor will they see rejected or unsubmitted bookings.
Plus, PMs can download time off to a CSV file, if needed.
Note:
- If the PM also has resource manager permissions, they’ll see the existing Allocation tab in place of this new Time Off tab, where time off already displays.
This feature will be available in the following products:
- Professional Services Automation or Professional Portfolio Management
- ProjectTime or ProjectTime Plus
- TimeBill Plus and TimeCost Plus when combined with:
- TimeAttend Plus
- Workforce Management
- Time Off Plus or Time Off Enterprise
Will this feature be enabled automatically?
No, you will need to assign PMs Team Time Off permission in their Project Management permission set before they will be able to access this feature.
TIME OFF
An update to time off delete approval
In Q1 of 2025, we added the option to allow approval when a user attempts to book time off, for each time off type.
Soon, we’ll be adding a new setting that lets administrators require approval for only past or only future bookings.

Note that this new field only displays if you’ve required approval, using the Require Supervisor Approval to Delete Bookings field.
We’re introducing this option to support the common scenario of allowing deletion of future time off without approval, while requiring approval when deleting past time off, since past time off has more impact on other data.
Will this feature be enabled automatically?
Yes, the new field will be visible by default once rolled out, but administrators will need to select one of the new options before other users will see any behavior changes in Replicon.
This field will default to Always if deletion approval is required, until it is updated by an administrator.
New deletion of submitted bookings option in Replicon
Currently, for each time off type, administrators can choose to allow one of the following to be deleted:
- All bookings
- No bookings
- Future bookings only
- Past bookings only
Soon, we’ll be allowing an additional option:
- Bookings up to X months in the past only
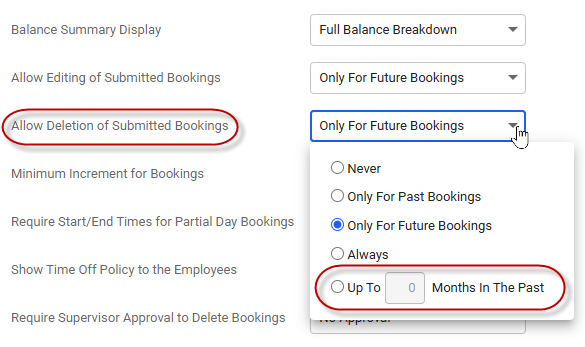
This change will let administrators enable certain common deletion rules, such as allowing users to delete past bookings, unless they fall beyond 90 days in the past.
Will this feature be enabled automatically?
Yes, when launched, this new option will be available by default to all administrators with time off access. But an administrator will need to select the new option before users will see any behavior changes in Replicon.
SCHEDULING
Project Manager shift scheduling
Soon, project managers will be able to carry out shift scheduling in Replicon, without needing schedule manager or supervisor permissions.
This will allow PMs to directly schedule their project team members, from the projects they own only. This is helpful in cases where the PM handles all shift scheduling for their team, and can also help filter shift workers if one manager acts as both PM and supervisor.
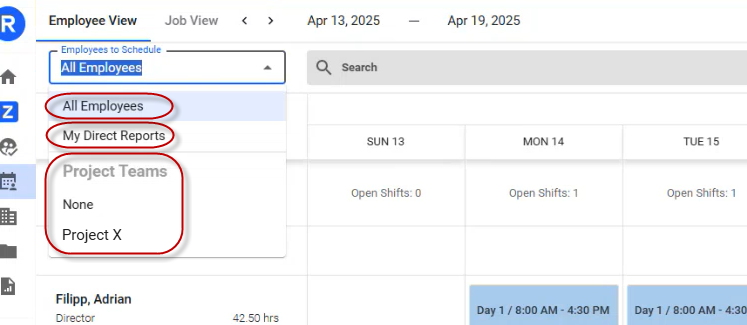
With this feature enabled, PMs assigned the required permissions will see a new field located at the top, left-hand corner of the Employee View page, called Employees to Schedule.
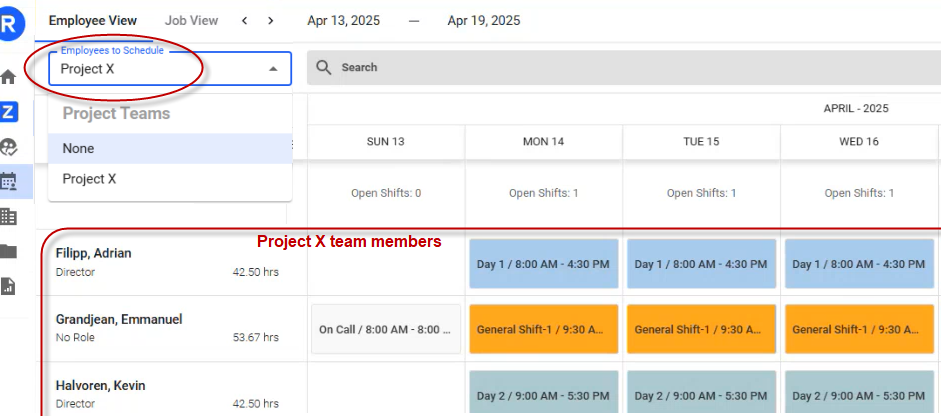
PMs choose a project from this field, and then members of that project team become available for scheduling.
If the PM also acts as a supervisor or schedule manager, they’ll be able to use this field to choose either All Employees (schedule manager access), My Direct Reports (supervisor access), or Project Teams (PM access) to schedule.
To allow PMs to schedule shifts, you’ll need to give them Shift Schedule permissions in their Project Management permission set. They can be allowed to carry out all scheduling functions if assigned edit, view, override validation, and upload shifts permissions.

Does this new feature change anything on the project management side?
No, all project management functionality will be unchanged. This feature doesn’t create a relationship between projects and shifts, and no information about scheduling will appear in the project management UI.
Notes:
- Project dates do not limit the scheduling date range (i.e. PMs can assign shifts to project team members outside of their project’s dates)
- Schedule managers can see and modify all shifts created by PMs (and supervisors), and all managers can alter shifts for their users, even ones scheduled by other managers
- PMs can manage shift schedules in the new scheduling UI only; the new UI has Employee View and Job View tabs located in the top, left-hand corner of the Schedule page

- This feature is available in all products and product combinations that offer project and scheduling features
Will this feature be enabled automatically?
No, administrators will need to assign scheduling permissions to project managers in their Project Management permission sets before those PMs will have access to the scheduling interface.
Shift Assignment Audit Trail report
Soon in Replicon, we’ll be offering a new report template and default report called Shift Assignment Audit Trail, that shows all changes (add, modify, and delete) made to shift schedules.
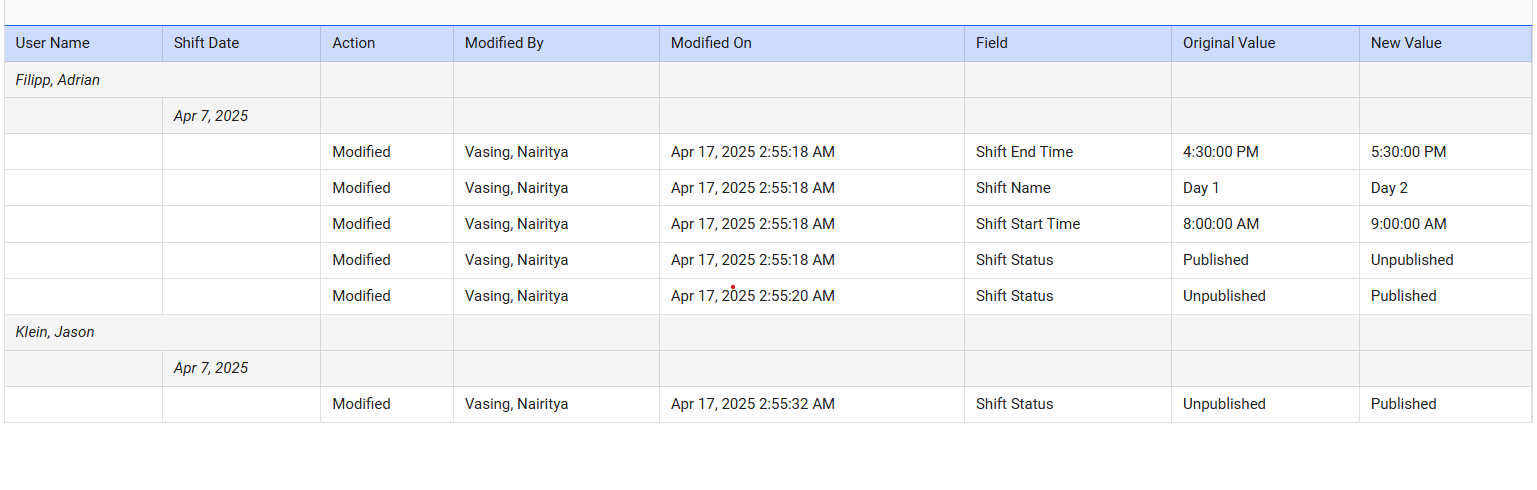
Schedule managers, supervisors, and project managers with scheduling permissions can use this report to:
- Track who made changes to schedules
- Check when changes were made
- Review the shifts assigned to individual employees and groups
For example, if an employee complains that a shift was updated right before it occurred so they didn’t receive enough notice, managers can use this report to confirm when the shift was scheduled.
Will this feature be enabled automatically?
Yes, when launched, this report will be automatically available to all managers who have access to view or manage shift schedules and have access to reports.
COMPLIANCE
New and updated compliance rules
This quarter, we added/updated the following compliance rules:
- We added two new out of the box pay rules this quarter, one for the British Virgin Islands and one for Uzbekistan.
- We released a Maximum Overtime Hours in a Period timesheet validation rule. This rule checks whether overtime hours exceed a specific limit you set within a rolling period.
- We added a Bookings must start prior to a date-based period time off booking validation rule that will primarily help support maternity leave compliance in some European countries. Users assigned this rule will be prompted to enter a date in a custom field when booking leave, and then the rule will check that the their leave begins some admin-configured number of days prior to that date.
- We’ve updated the Yearly/Monthly Accrual with Expiry & Rounding time off accrual rule to ensure that the correct expiry amount is shown after a time off booking is made, and that time off is automatically recalculated when an end date is added in the user profile, so it can be used on its expiration date.
Q2 2025 - In Replicon & Polaris
TIMESHEETS
Timesheet template effective dates
Sometimes, administrators need to change which timesheet template a user or group of users is assigned – for example, if users change departments or locations.
Soon, when administrators assign new templates to users in their user profiles, they will be able to choose when the assignment takes effect. This has two main benefits:
- It allows admins to set up new timesheet templates before the new template takes effect
- It allows a record of old template assignments to be saved when a template is changed

Do the new template settings take effect on the effective date?
New assignments will take effect only when a new timesheet begins, so new settings will only take effect on the effective date if the effective date falls on the first day of a new timesheet period. For example:
- If a timesheet period runs from Sep 1 to 7, but you assign a new template with an effective date of Sep 3, settings for the newly assigned template will come into effect on Sep 8, when a new timesheet period begins
- But, if the effective date was Sep 1, the new settings would take effect on Sep 1
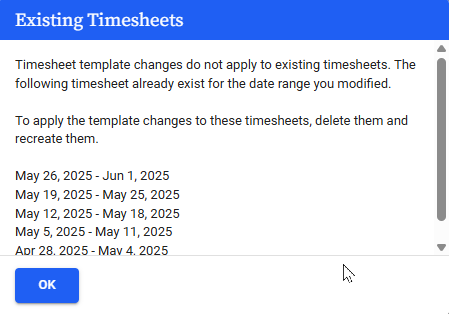
Will the new settings apply to timesheets that have already generated?
No. A timesheet’s template settings are locked in when it is created. So, the template settings for an existing timesheet can only be modified by deleting and regenerating the timesheet.
To help admins know what timesheets have already been generated, that begin on or after the new effective date, they will be shown an Existing Timesheets dialog that lists those timesheets, but only when editing a single user profile. Then, they can delete any that need the new settings to apply.
Note:
- The user’s currently assigned Timesheet Owner Permissions in their template always apply to all of their timesheets, so if you update these permissions, you might see changes in the behavior in timesheets assigned old templates
Will this feature be enabled automatically?
When launched, this feature will be available to all administrators by default. For each user, the currently assigned timesheet template will be assigned as the Initial timesheet template, which applies to all newly created timesheets until an administrator adds a new assignment.
Project Time Correction report
We’ll soon be adding a report template designed for project managers called the Project Time Correction report.
This report allows project managers to:
- Check for post-approval changes that may impact previous client billing
- Review changes they’ve asked team members to make, in a single location
This report shows all corrections that were made to project time after the corresponding timesheets were approved, but only for projects the PM owns. That is, co-managers and project administrators with All Project access can’t use this report.
The report shows the following for each changed entry:
- Project/task selected
- Billing rate selected
- Hours Before, Hours After, and Change in Hours
Include the Modified On and Entry ID columns to ensure you see details of the changes for each entry.

Changes to the following will not be shown:
- Activities on the row where project time is entered
- Time entry comments
- Custom fields on the row/entries where project time is entered
- Client selection for time entered against User’s Choice projects
- Changes from deleted timesheets
Notes:
- Only project managers who have permission to approve time for their projects can access this report
- No default report is available; you must create reports using the template
- The report only includes changes made in Time Distribution or In/Out + Allocation timesheets
- Changes to time punches and legacy timesheets are not included
- Changes to time entries that can be submitted independently of a timesheet are included, but only if they occurred after approval of their timesheet
Will this feature be enabled automatically?
Yes, when launched, this template will be automatically available to all project managers with access to view reports.
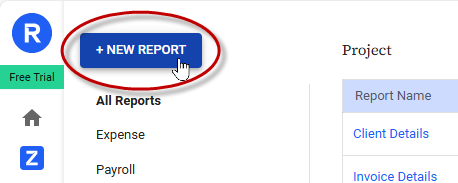
No default version of this report will be available on the Reports page; you’ll have to select the New Report button located in the top, left-hand corner of the Reports page to access this report.
Q1 2025 - In Replicon & Polaris
ZEROTIMETM
Auto Populate timesheets in ZeroTimeTM
Replicon/Polaris's ZeroTimeTM feature enables automatic collection of work hours and activities that users can apply to their timesheets.
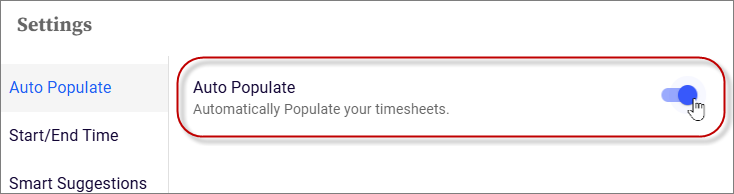
Now, ZeroTime offers an Auto Populate feature. This feature allows time and related data to be collected and allocated to timesheets without any manual intervention by the user, resulting in literally zero time spent populating the timesheet.
To enable this feature in ZeroTime, ensure your data collectors are set up as desired, then go to Settings and enable the Auto Populate setting.
After that, as you work, ZeroTime’s machine learning algorithm will collect and assess data according to your work patterns, then add hours with their associated tasks and projects to your timesheet.
You’ll never had to take any other action in ZeroTime – you’ll simply have to review your timesheet to check that it’s correct before you submit it.

Refer to Using ZeroTime in Auto Populate mode for more information.
ZeroTimeTM suggestions based on historical timesheets, favorites, and defaults
Currently, when an employee starts using ZeroTimeTM, it can take a few days for our machine learning algorithm to train on their usage patterns. So, we’ve been looking for ways to make ZeroTime effective and efficient more quickly.
This quarter, we’ll be updating our algorithm to account for patterns in the user’s historical timesheets.
With this change, ZeroTime will understand the work patterns of existing Replicon/Polaris users as soon as they start using the feature. They should see suggestions immediately and won’t have to give as much manual feedback, plus they can turn on the Auto Populate feature right away.
In addition, when making suggestions, ZeroTime will consider an employee’s timesheet favorites:
and their timesheet custom field default values:
Enhanced ZeroTimeTM inline timer
When using ZeroTime to record a note, a timer is available that you can use to keep track of time spent working on a particular task.
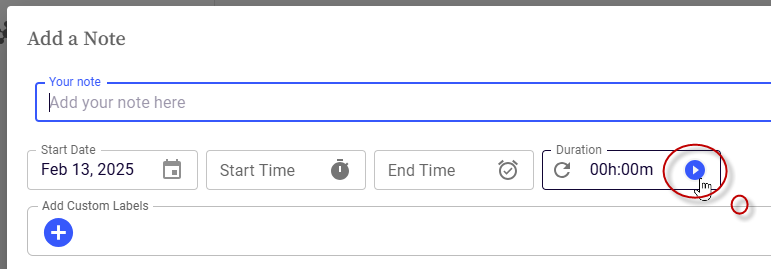
However, currently, you have to remain within the Notes dialog to keep the timer running.
So, to make the timer more useful, we’ll soon be upgrading it so it keeps running when you leave the Notes dialog. It will continue to run in the background as you work on other pages until you stop it.
While the stopwatch is running, you will see a banner on each page, to remind you that it’s still recording time.
TIME OFF
Holiday calendar effective dates
Currently, when you assign a holiday calendar to a user, you can’t include an effective date. This means you can only assign one calendar at a time, and any new calendar you assign will overwrite the last one. This can cause problems, such as the following:
- When calendars are updated, historical data that relies on holiday dates may be lost
- System administrators can’t set up new calendar assignments in advance
Introducing effective dates
So, you’ll soon be able to set effective dates when assigning holiday calendars to users.

You’ll be able to assign as many calendars as you need, that take effect in the future or in the past. For each calendar assigned, its holidays will be updated wherever they appear (such as in time off balance calculations or in the time off calendar), for its effective date range.
Holiday calendars are assigned on the Schedule tab of user profiles, and can be updated for multiple users at once using the user mass edit feature.
New option to update holiday bookings based on new calendar assignments
When you update a user’s holiday calendar assignments, you’ll see a new option that will let you update all automatically-generated holiday bookings to match the new assignment.
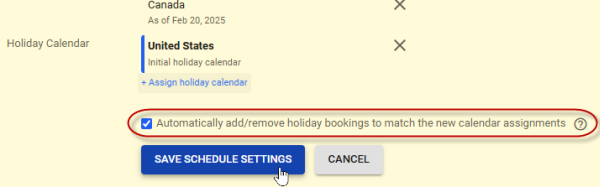
For example, if a US holiday calendar is in effect, and you switch it to a Canadian holiday calendar as of Mar 1, US holiday bookings will be retained for Jan and Feb, but will be removed for the rest of the year replaced with Canadian holiday bookings.
Notes:
- If, due to an updated holiday calendar, a holiday is added or removed from a time off booking, the booking will be reopened and recalculated, as will any closed timesheets that bookings appear on.
- If your organization doesn’t auto-generate holidays bookings or use timesheets, you’ll have to manually delete and add holiday bookings to reflect new holiday calendar assignments.
- If you have a customization or integration that may be impacted by this change, rollout of this feature may be delayed while we evaluate whether it will be affected by this change. We will update the customization or integration, if necessary.
TIMESHEETS
New approval date/time column in Time Entry Details report
We’ve added a Time Entry Approval Date/Time column to the Time Entry Details report template.
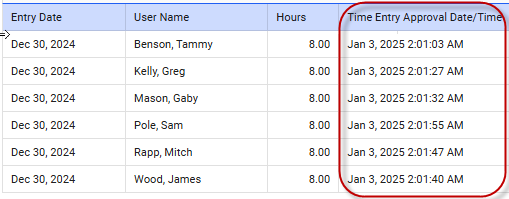
This column is primarily useful for customers with multiple downstream ERPs, who therefore use reports to transfer data to their ERPs, rather than the Time Workbench.
The column lets those customers isolate time entries by the hour approved, every hour, allowing them to make very frequent – essentially real time – data syncs, so hours can be billed as quickly as possible.
SYSTEM
Upgrades to meet new WCAG standards
WCAG standards are defined by the World Wide Web Consortium (W3C), and help organizations ensure their products and websites are accessible to people with disabilities.
In December 2024 the W3C published revisions to its standards -- including revisions to WCAG 2.1 AA, which Replicon and Polaris support.
Therefore, we’ve been making some adjustments to our products to ensure we meet the new requirements. Those changes will be completed this quarter.
We’ll provide a link to our updates WCAG support documents once these changes have been fully implemented.
Q1 2025 - In Polaris
PROJECT MANAGEMENT
Dela project risk management (limited availability)
Project delays can have a serious impact on your business. Delayed projects equal ballooning budgets, sub-optimal resourcing, lost customers and prospects, and the delay or cancellation of new initiatives.
That’s why it’s so important to understand, as early as possible, which projects are at risk and require remediation.
To help project managers better predict project risk, we’ll soon be launching Dela Project Analytics, an AI-powered tool that will show project managers:
- Whether a delay is likely, and
- A predicted completion date, with a confidence threshold percentage
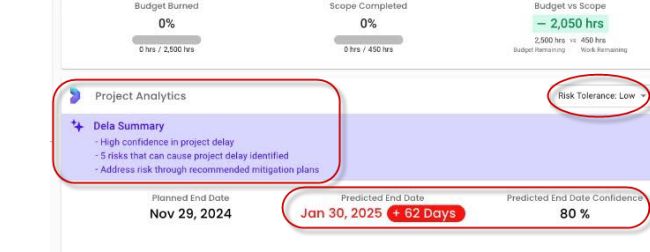
To arrive at these predictions, the widget compares the progress of the project to the progress and completion data for all historical projects in your Polaris system.
And, since a PMs tolerance for risk might differ depending on the project, Dela offers a risk tolerance setting that you can configure for each project. Higher tolerance means Dela must predict a longer delay before it will show a warning; for low tolerance projects, even short delays will trigger a warning.
In addition, to help PMs mitigate the risk of delay, Dela will show PMs a summary of current risks, based on an analysis of five key risk areas. And, it will provide a mitigation plan for addressing the identified risks.
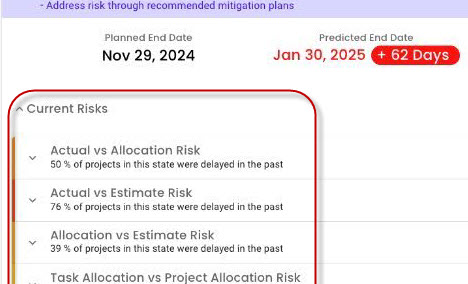
Linked projects
The projects project managers create are sometimes, or often, related to each other in some way.
For example, you might create a project for each phase of a larger project you need to complete. Or, you could create a project for each change request related to a bigger project.
Previously in Polaris, there was no way to link related projects to one another. But that has changed.
You can now link projects together. There are three types of links to choose from:
- Change Requests
- Phases
- Relates To
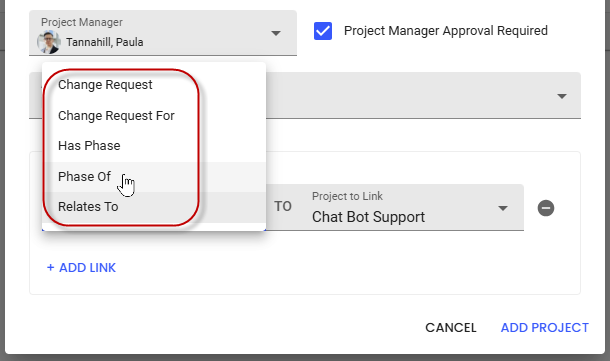
Linking projects can help users better understand how projects relate to each other, and allows you to instantly view hours, cost, and revenue totals for all linked projects, using the Linked Projects tab.
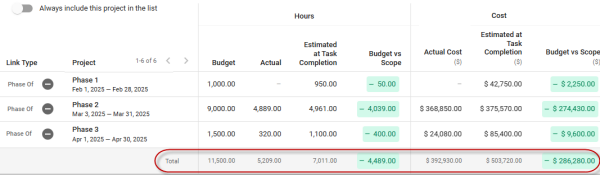
Note that linking projects does not establish a hierarchical relationship between those projects; Any linked project will have its own budget, resourcing, billing, revenue and costing, like any other project.
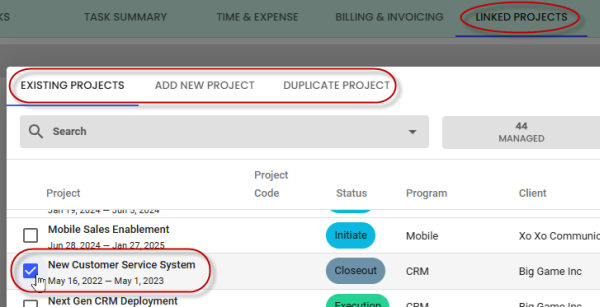
You can link projects when creating or duplicating a project or when using the new Linked Projects tab in existing projects:
Task dates can be set to roll up to their parent
Previously in Polaris, when a child task’s dates changed, their parent task’s date range didn’t update.
So, if a child task was delayed or finished more quickly than expected, sub-task dates could have extended beyond the date range of their parent task.
Both of these scenarios created confusion and made project estimation and planning more difficult.
So in Q1, we launched a new setting that, when enabled, automatically adjusted parent-level dates to match the earliest and latest child task dates.

For example, imagine you set up a task with a date range of Feb 1 to 20. But, one of its child tasks that is set to end on Feb 20 is delayed, so you need to shift it to end on Feb 28. If you have the new setting enabled, when you update the child task date, the parent task’s end date will automatically update to end on Feb 28, too.
Similar automatic adjustments will occur if a child task’s start date is moved before its parent task’s start date.
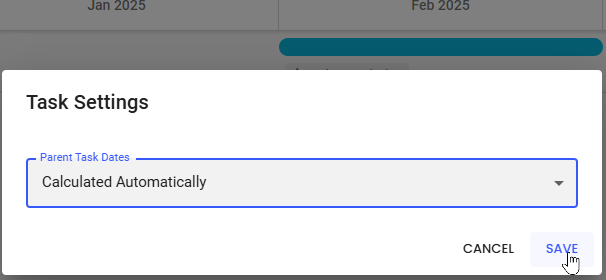
Project managers can choose this new automatic mode or the existing manual mode, on a per-project basis. To do this, they click the settings icon on the Tasks tab:
![]()
Then, select the desired mode from the Project Task Dates field:
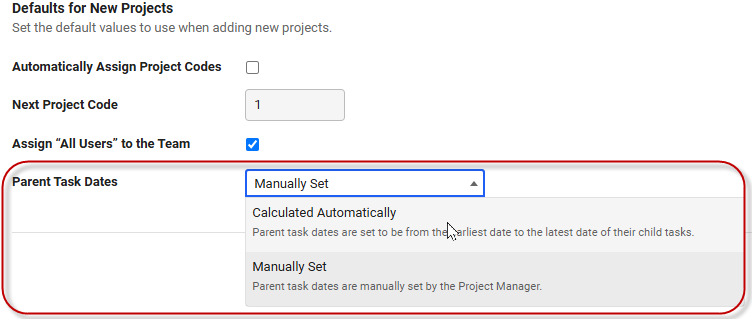
Administrators can set the system-level new project default for this feature on the Project Settings page. This has been set to Manually Set mode (the existing behavior) for existing customers, so your task behavior doesn’t change. But, you can update this if you want all new projects to default to manual mode.
Notes:
- Once you’ve created a task in Manually Set, you cannot switch to Calculated Automatically, so you can’t change to automatic mode for any existing project that has tasks already. However, you can move from automatic mode to manual mode at any time.
- In automatic mode, once you’ve added a child task, its parent task dates will be uneditable since any date changes that follow will be based on the child task dates
- In automatic mode, if you have child tasks that have their own child tasks, changes at the lowest level will cascade up to the highest task level in the hierarchy
- Project dates will never update to match task date ranges
- In automatic mode, task dates are mandatory
Cost manager role
This quarter, we’ve be added a new role to Polaris: Cost manager.
Users assigned this role are allowed to approve, force approve, reject, reopen, and delete time and expense sheets.

This role is similar to the cost manager role we currently offer in Replicon, and allows customers using it to more easily upgrade to Polaris.
Note that users assigned this role do not have access to the Time Workbench, as they do in Replicon. We plan to add the Time Workbench to Polaris in the future.
Q1 2025 - In Replicon
TIME OFF
TOIL pay codes can be linked to a time off type
If you use time off in lieu (TOIL) in Replicon, for each pay code employees can select when allocating TOIL, you’ll soon be able to set an associated time off type.
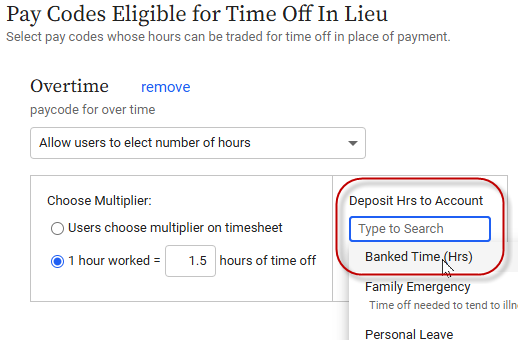
Then, whenever a user selects a pay code for TOIL on their timesheet, the associated time off type will be automatically populated.
This change should make it easier for employees to submit TOIL, and should reduce errors.
COMPLIANCE
New statutory pay rule: Cayman Islands
This quarter, we’ve introduced a new out of the box statutory pay rule for the Cayman Islands. It is currently available in our pay rules library.
We’ve also updated the Lithuania default pay rule to reflect a recent legislative change that requires any overtime work performed during night hours of a public holiday to be compensated at a rate not less than two and a half times (2.5x) the employee's standard wage.
You can find more information about each of these pay rules, and about the dozens of other statutory pay rules we offer for the U.S. states and other countries around the world, at Administration > Pay Codes and Policies > Pay Rules.
New time off booking validation rule: Ensure a gap between two bookings
This quarter, we launched a new time off booking validation rule called Ensure a gap between two bookings that checks that there is, at minimum, an amount of time you specify between two time off bookings.
This rule can be used to meet Ireland's parental leave requirement that there must be at least a 10 week gap between two bookings.
Q4 2024 - In Replicon
TIMESHEETS & PUNCHES
Report for project-dependent timesheet custom fields
Last year, we added the ability to set up project-dependent custom fields to timesheets – that is, fields that only display when the project they are associated with is selected on a timesheet. Refer to Setting up project-dependent custom fields for more information on setting up this feature.
In Q4, we added a Project Timesheet Field report template that project managers can use to track which fields and options are enabled for each project, along with their valid start and end dates.

This report provides a single location for checking whether your project-dependent fields are set up correctly.
Managers will need Projects > Timesheet Fields > View permission in their project manager permission set to view this report.
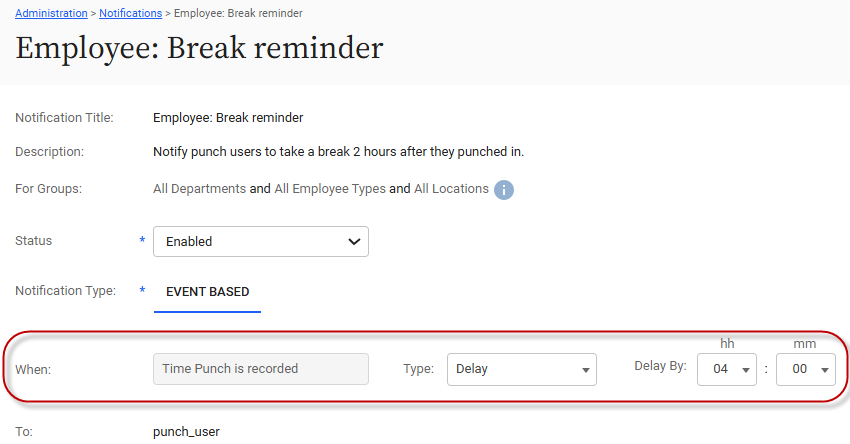
Break reminder notifications
We’ve adding a Break reminder push notification that alerts punch employees that it is time for them to take a break.
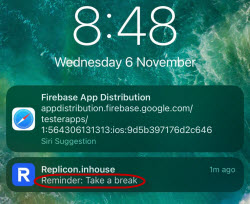
This notification can help promote break schedule compliance, and can reduce the break penalties that are incurred, in some regions, when employees fail to take required breaks.
Administrators can enable these break notifications via the Notifications System > Notifications tab. They can set the required length of delay from the user’s first In punch to the time when the break must be taken, and can set up multiple notifications using different delays, if needed.
Notes:
- If an employee takes their break ahead of schedule, scheduled notifications will not be cancelled. Administrators can handle this possibility by including a statement like, If you’ve already taken your break, please ignore this message.
- Notifications won’t be sent for shifts that span midnight. We plan to add support for midnight crossovers in the future.
TIME OFF
Inclusion of pay code details for TOIL deposits in the Time Off Transaction report
We now include the pay code used to deposit time off in lieu (TOIL) in the Description field of reports based on the Time Off Transaction report template.
![]()
This is helpful since TOIL policies can be set up to use several different pay codes – like Overtime, Double Time, etc – so it wasn't previously obvious to payroll and other managers what was used.
Pay codes do not appear for TOIL data collected prior to the launch of this feature.
SCHEDULING
Shift assignment download and upload
You can now download and upload shift assignments from and to the Schedule page using a CSV file.
This can help make adding and updating schedules easier; for example, you could download the current schedule, make changes in the CSV file, then upload your changes.
To upload or download a CSV, click the Actions menu on the schedule page, and select either Download CSV or Upload CSV.
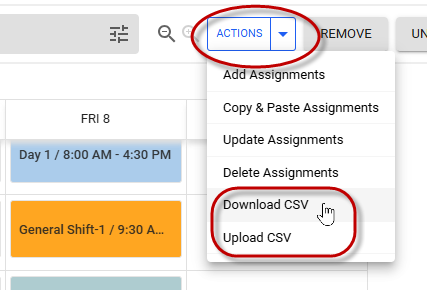
If downloading data, choose which fields to download, and then click Download CSV.
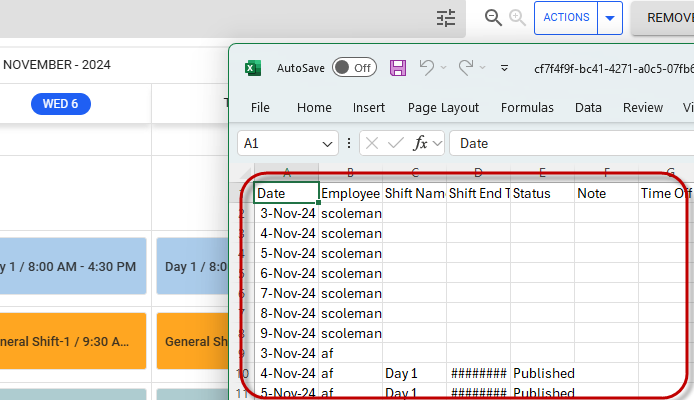
All days will show, not just those with shifts scheduled, to aid in reading the spreadsheet.
If uploading, similar to our other imports, you can download a sample file to base your import on. Before it’s entered onto the scheduling page, your data will be validated for correct nomenclature.
Refer to Downloading and uploading a schedule for more information.
Notes:
- Imports will not be validated against schedule rules, though we plan to add that functionality in the future.
- Schedule managers will require Shift Upload permission in their schedule manager permission set before they can upload schedules.
Schedule validation rules and schedule policies
You can now validate user shift schedules using schedule validation rules.
Schedule validation rules are similar to our timesheet validation rules, except they apply when user schedules are being created. For example, you could set up a rule that checks that a user has sufficient rest periods within their scheduled shifts, that returns an error or a warning when you're creating a schedule that has insufficient rest periods.
The warning or message displays in the top, right-hand corner of the job-based scheduling interface.
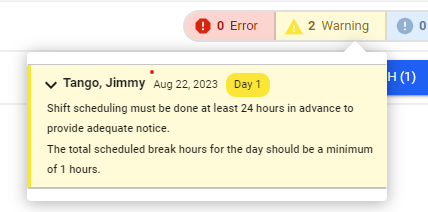
These rules can help enforce compliance with labor laws, or with your company's unique policies, and can help schedule managers set up schedules more quickly.
These are the rules that are now available:
|
|
To assign schedule validation rules to users, an administrator must first create one or more schedule policies, where they can assign validation rules that are applicable to a user or group of users. Then, they can assign these policies to users in their user profiles.

Refer to Setting up schedule validation policies and rules for more information.
Scheduling UI enhancements
On the Schedule page, we’ve added a Jump to Page option, and the ability to choose the number of records that display on the page. You can access both of these new options by clicking the page navigation widget.
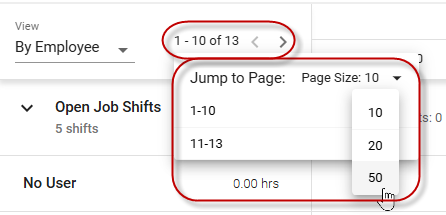
We’ve also added the ability to navigate by month to the date picker at the top of the page.
COMPLIANCE
Three new statutory pay rules in Replicon: Mauritius, El Salvador, Dominican Republic
This quarter, we’ve introduced three new out of the box statutory pay rules: one for Mauritius, one for El Salvador, and one for Dominican Republic. These rules are currently available in our pay rules library.
We’ve also launched an updated version of our Colombia pay rule; we reduced the Weekly Overtime Limit from 47 to 46 to align with a change in local labor laws.
You can find more information about each of these pay rules, and about the dozens of other statutory pay rules we offer for the U.S. states and other countries around the world, at Administration > Pay Codes and Policies > Pay Rules.
Option to have the Payroll Workbench automatically distribute overtime to projects, tasks, and activities in U.S. pay rules
When customers export payroll data using Replicon’s Payroll Workbench, they often want those hours to be distributed against the projects, tasks, and/or activities the users worked on – using the correct pay codes (e.g. regular vs overtime hours), and according to the pay rule in use. This automated behavior is primarily needed when integrating with other applications.
In the past, customers could only achieve this functionality by using a custom pay rule. But soon, we’ll be offering an out of the box solution in all of our U.S. pay rules that doesn’t require any pay rule customization.
To enable this feature, you’ll need to contact Deltek Support, and have them set up the key value pairs required for this feature to work. This is a one-time only setup step. Plus, you’ll need to select the project, task, and/or activity columns that hours were worked against in the Payroll Workbench.
Then, hours will automatically be distributed to the appropriate projects, tasks, and activities when you export using the Payroll Workbench.
We plan to extend this functionality to other regions’ pay rules in the future.
New time off accrual rule: Monthly/Yearly Accrual Based on Weekly Scheduled Days
We’ve introduced this new accrual rule, primarily to support compliance requirements in Austria. Using this rule, administrators allot annual or monthly time off by entering the number of weeks the employees should have off.
For example, an employee scheduled to work 4 days per week could be assigned 5 weeks of annual leave, resulting in 20 days off.
INTEGRATIONS
Replicon - SAP Endorsed App integration updates
We’ve made some updates to our SAP integration, including the following:
- Support for Code Name and Code Code in the SAP User Criteria sync
- Additional data sent from Replicon to SAP to help customers monitor for, identify, and manage errors
- Ongoing scalability and performance improvements
Q4 2024 - In Polaris
BILLING
Advanced rate card
Currently in Polaris PSA, you can bill clients using a resource, role, or project rate.
However, some organizations use other criteria to determine billing rates, such as whether the work is completed during overtime, or whether the work is associated with a particular activity. Some even use a combination of factors to determine at what rate clients are billed.
Soon, we’ll be updating the rate card for each project in Polaris to support a wider range of billing scenarios.
Initially, this card will support billing by pay code, along with the existing rate types. So, time that uses a particular pay code, like Overtime, can be billed at a particular rate.

You’ll also be able to bill according to multiple dependent dimensions. For example, you could set up a rate that bills overtime a resource works while performing the developer role, and a different rate when their colleague works regular hours as a development manager.
To bill by pay code, you’ll need to be using a product that supports them (i.e. TimeAttend Plus or Workforce Management.
EXPENSES
Option to have only approved expenses available to bill
Currently, all expense sheets are available to bill to customers – even ones that have not yet been approved.
But, some customers would like only approved expense sheets to be available for inclusion on bills.
So, we’ll soon be adding a Bill Expenses field to the Allowed Expenses & Estimates card in projects, which will let project managers allow only approved expense sheets to be available to bill.
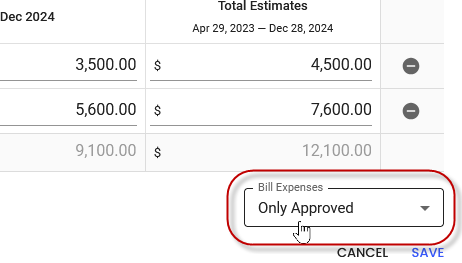
With Only Approved selected, only expense items that have been approved will be available to add to bills on the Billing & Invoicing tab.
RESOURCING
Project links on the Quick Allocation page in Polaris
We’ve added links to projects from the Quick Allocation page. This should help project managers access information about projects they’re allocating resources to.
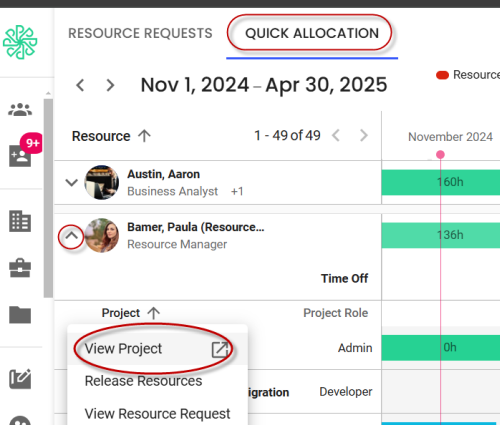
To access a project link:
- Click the arrow beside the resource name.
- Find the project you want to view.
- Click the icon located next to the project’s name.
![]()
- Select View Project.
You will be taken to that project’s landing page.
PMs will only see a link under projects they have permission to view.
Q4 2024 - In Replicon & Polaris
TIMESHEETS
New Daily Time Summary timesheet component
You can now add a new optional Time Summary component for timesheets, that will show daily time worked, along with timesheet-level totals.

When you add this component to a timesheet template, you can choose whether time is broken down by:
- Billable and non-billable hours
- Work hours, break hours, and time off hours
- Total hours
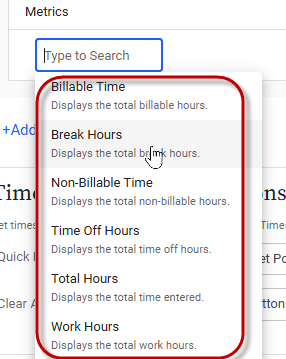
This table can help you gauge the content of the timesheet at a glance, and may be especially useful if the project includes many project rows.
With this component enabled, timesheet-level totals (for the options you selected) will also display in the top, right-hand corner of the timesheet (in addition to any other metrics displayed there, if applicable.)
This data will display immediately in most cases, with the exception of time punches timesheets with the Allocate Time to Days option set to Split Across Midnight or Trailing Day; for these timesheets, data will update after the timesheet recalculates.
Submitted timesheets will not be reopened if a new booking is attempted, but is unsuccessful
Previously, if a timesheet was in a submitted state, and a user attempted to create a booking that fell within that timesheet period, the timesheet reopened, even if submission of the booking failed.
So, to prevent timesheets from having to be reapproved unnecessarily in this scenario, we now prevent timesheets from reopening if creation of a booking is not successful.
Note that this applies only when creation of a new booking is attempted; it won’t apply when an existing booking is edited.
Pay code visibility for project managers
Some users have a Distributed Time Type column in their timesheet’s Time Distribution Grid that they use to allocate hours from punches or in/out entries to projects, tasks, and activities. This is sometimes called a ‘hybrid’ timesheet, and it requires that the Payroll time distribution category be enabled in timesheet templates.
Previously, the pay codes (e.g. Regular Time, Overtime) users select from the Distributed Time Type column did not display in the timesheet when viewed by project managers during approval. This made it difficult for those managers to track and limit overtime for their projects.
In Q4, we added a View Distributed Time Type Column permission in Project Manager permission sets that, when enabled, makes that Distributed Time Type column visible to PMs when approving timesheets for their projects.
TIME OFF
Control over who can view files attached to time off bookings
In Q4, we started allowing limiting access to time off booking attachments or web addresses (URLs) to managers with a particular permission enabled. This change can help maintain compliance – for example, by limiting access in countries that allow only HR reps to view things like doctors’ notes.
To set up this restriction, enable the Restrict access check box when setting up the time off custom field used to attach the files.
Then, assign the new Restricted Field Values permission only to those who are allowed to view restricted files, within their Supervisor or Payroll Manager permission sets. Note that with this permission enabled users can view all files with Restrict access checked.
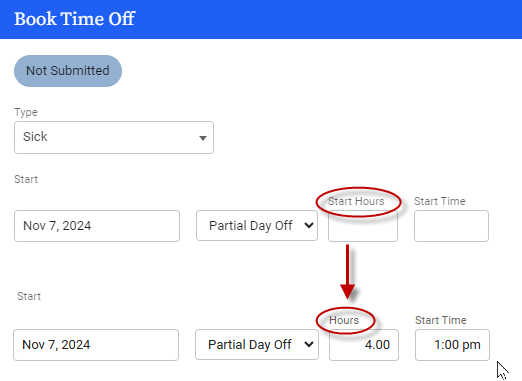
Renaming of the Start Hours field in time off bookings
We've renamed the Start Hours field to Hours, in partial-day time off bookings, to clarify what this field means.
EXPENSES
Ability to set a default reimbursement currency for a user’s expenses
On expense sheets, the reimbursement currency (that is, the currency used when a user is reimbursed for an expense they covered), currently defaults to your system’s base currency.

This means users who want to use a different currency, say their local currency, need to reselect this currency every time they complete an expense sheet. This can cause errors that lead to payroll delays and inaccuracies.
So, we’re introducing the option to set a default reimbursement currency on the Expenses tab in user profiles.
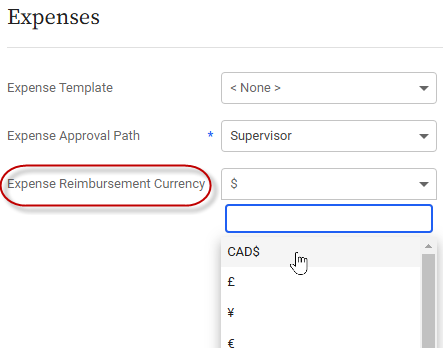
We’ll also be adding a User can override Expense Reimbursement Currency permission to expense templates which, when enabled, will allow users to choose a different currency than the default.
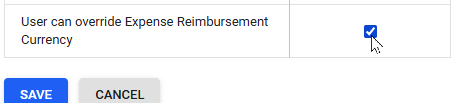
Without this permission enabled, the default currency is fixed and must be used in all expense sheets – the field will display but be un-editable.
Further, we’ll be splitting the existing Reimbursement Amount column on expense list pages into one that uses the Reimbursement Currency and one using the Base Currency . These can be shown or hidden by clicking the ![]() cog.
cog.

INTEGRATIONS
Replicon Resource Management for Costpoint add-on
We’ve launched an add-on to our Replicon-Costpoint integration, for Costpoint customers or prospects who want to use Costpoint for time tracking, and Polaris for advanced resourcing.
With this integration:
- Users, projects, budget assignments, and time off for users is transferred from Costpoint to Polaris
- Resourcing data is transferred from Polaris to Costpoint’s Budget & Planning Module
For more information, speak to your Customer Success manager.
Approver name available in business analytics API
Replicon and Polaris offer a business analytics API that you can use to visualize your data using Tableau or PowerBI.
This quarter we’ll be adding an Approver name field that customers can include in their visualizations. This new field will save them from having to manually access this info when they’re analyzing timesheets that are awaiting approval.
For more information on analytics options, refer to Gaining business intelligence using your Replicon data.